
[fusion_builder_container hundred_percent=”yes” overflow=”visible”][fusion_builder_row][fusion_builder_column type=”1_1″ last=”yes” spacing=”yes” center_content=”no” hide_on_mobile=”no” background_color=”” background_image=”” background_repeat=”no-repeat” background_position=”left top” border_position=”all” border_size=”0px” border_color=”” border_style=”” padding=”” margin_top=”” margin_bottom=”” animation_type=”” animation_direction=”” animation_speed=”0.1″ class=”” id=””][fusion_text]
TUTORIAL ILUMINAÇÃO: COMO
FOTOGRAFAR ÓCULOS
Aqui é um tutorial passo a passo sobre como fotografar óculos
O QUE VOCÊ PRECISA
03- Soft light 50x50cm
03- Lampadas 150w
02- Tripés mini 803
01- Girafa Grande
01- Mesa de still pequena
Primeiramente este é nosso resultado final com um leve toque de brilho e contraste e também
giramos a foto recortamos as bordas brancas:[/fusion_text][/fusion_builder_column][fusion_builder_column type=”1_2″ last=”no” spacing=”yes” center_content=”no” hide_on_mobile=”no” background_color=”” background_image=”” background_repeat=”no-repeat” background_position=”left top” border_position=”all” border_size=”0px” border_color=”” border_style=”” padding=”” margin_top=”” margin_bottom=”” animation_type=”” animation_direction=”” animation_speed=”0.1″ class=”” id=””][fusion_imageframe lightbox=”yes” lightbox_image=”https://blog.lumitecfoto.com.br/wp-content/uploads/2016/04/MG_7559-300×217.jpg” style_type=”dropshadow” hover_type=”zoomin” bordercolor=”” bordersize=”1px” borderradius=”1px” stylecolor=”#000000″ align=”none” link=”” linktarget=”_self” animation_type=”slide” animation_direction=”down” animation_speed=”0.1″ hide_on_mobile=”yes” class=”” id=””] 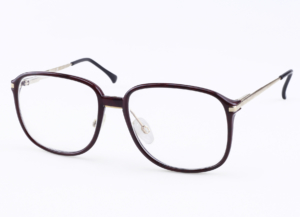 [/fusion_imageframe][/fusion_builder_column][fusion_builder_column type=”1_2″ last=”yes” spacing=”yes” center_content=”no” hide_on_mobile=”no” background_color=”” background_image=”” background_repeat=”no-repeat” background_position=”left top” border_position=”all” border_size=”0px” border_color=”” border_style=”” padding=”” margin_top=”” margin_bottom=”” animation_type=”” animation_direction=”” animation_speed=”0.1″ class=”” id=””][fusion_imageframe lightbox=”yes” lightbox_image=”https://blog.lumitecfoto.com.br/wp-content/uploads/2016/04/MG_7577-300×217.jpg” style_type=”dropshadow” hover_type=”zoomin” bordercolor=”” bordersize=”1px” borderradius=”1px” stylecolor=”#000000″ align=”none” link=”” linktarget=”_self” animation_type=”slide” animation_direction=”down” animation_speed=”0.1″ hide_on_mobile=”yes” class=”” id=””]
 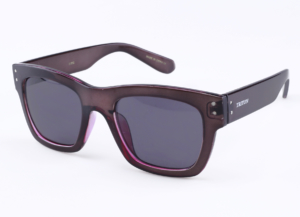 [/fusion_imageframe][/fusion_builder_column][fusion_builder_column type=”1_1″ last=”yes” spacing=”yes” center_content=”no” hide_on_mobile=”no” background_color=”” background_image=”” background_repeat=”no-repeat” background_position=”left top” border_position=”all” border_size=”0px” border_color=”” border_style=”” padding=”” margin_top=”” margin_bottom=”” animation_type=”” animation_direction=”” animation_speed=”0.1″ class=”” id=””][fusion_text]Dica importante: Todas fotos acrescente um pouco de brilho, contraste e
nitidez, isso vai dar vida aos seu produtos, não precisa ser Photoshop,
qualquer programa de edição de imagem tem essas opções, isso já corrige um
pouco de acinzentado e dá um realce ao seu óculos
Abaixo temos 2 tipos de fotos, sendo que a primeira imagem fotografamos um óculos com lentes reflexivas transparentes e a segunda foto, um óculos de sol, ambas imagens no modo automatico:[/fusion_text][/fusion_builder_column][fusion_builder_column type=”1_2″ last=”no” spacing=”yes” center_content=”no” hide_on_mobile=”no” background_color=”” background_image=”” background_repeat=”no-repeat” background_position=”left top” border_position=”all” border_size=”0px” border_color=”” border_style=”” padding=”” margin_top=”” margin_bottom=”” animation_type=”” animation_direction=”” animation_speed=”0.1″ class=”” id=””][fusion_imageframe lightbox=”yes” lightbox_image=”https://blog.lumitecfoto.com.br/wp-content/uploads/2016/04/IMG_7562-300×217.jpg” style_type=”dropshadow” hover_type=”zoomin” bordercolor=”” bordersize=”1px” borderradius=”1px” stylecolor=”#000000″ align=”none” link=”” linktarget=”_self” animation_type=”slide” animation_direction=”down” animation_speed=”0.1″ hide_on_mobile=”yes” class=”” id=””] 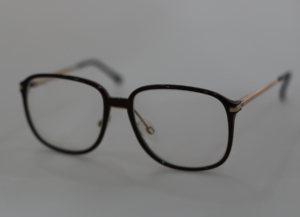 [/fusion_imageframe][/fusion_builder_column][fusion_builder_column type=”1_2″ last=”yes” spacing=”yes” center_content=”no” hide_on_mobile=”no” background_color=”” background_image=”” background_repeat=”no-repeat” background_position=”left top” border_position=”all” border_size=”0px” border_color=”” border_style=”” padding=”” margin_top=”” margin_bottom=”” animation_type=”” animation_direction=”” animation_speed=”0.1″ class=”” id=””][fusion_imageframe lightbox=”yes” lightbox_image=”https://blog.lumitecfoto.com.br/wp-content/uploads/2016/04/IMG_7578-300×217.jpg” style_type=”bottomshadow” hover_type=”zoomin” bordercolor=”#000000″ bordersize=”” borderradius=”” stylecolor=”#000000″ align=”none” link=”” linktarget=”_self” animation_type=”zoom” animation_direction=”down” animation_speed=”0.1″ hide_on_mobile=”no” class=”” id=””]
 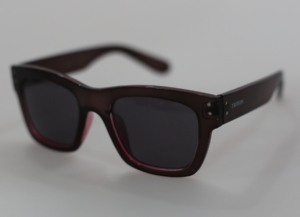 [/fusion_imageframe][/fusion_builder_column][fusion_builder_column type=”1_1″ last=”yes” spacing=”yes” center_content=”no” hide_on_mobile=”no” background_color=”” background_image=”” background_repeat=”no-repeat” background_position=”left top” border_position=”all” border_size=”0px” border_color=”” border_style=”” padding=”” margin_top=”” margin_bottom=”” animation_type=”” animation_direction=”” animation_speed=”0.1″ class=”” id=””][fusion_text]Percebe-se nitidamente que ter uma das melhores câmeras profissionais, e usa-las
sem nenhuma iluminação no modo automático, que seja, é o mesmo que pegar um
celular e fazer a foto.
Então esqueça em ter uma câmera top do mercado, se você não tem a iluminação e
a configuração correta para trazer um resultado profissional.
Segue abaixo, uma das formas de conseguir a sua imagem perfeita:
PASSO 1
A primeira coisa é obter
o posicionamento correto para os óculos, importante o ângulo para favorecer a
visualização do produto.[/fusion_text][/fusion_builder_column][fusion_builder_column type=”1_3″ last=”no” spacing=”yes” center_content=”yes” hide_on_mobile=”yes” background_color=”” background_image=”” background_repeat=”no-repeat” background_position=”center center” border_position=”all” border_size=”0px” border_color=”” border_style=”solid” padding=”” margin_top=”” margin_bottom=”” animation_type=”0″ animation_direction=”down” animation_speed=”0.1″ class=”” id=””][fusion_imageframe lightbox=”yes” lightbox_image=”https://blog.lumitecfoto.com.br/wp-content/uploads/2016/04/IMG_7567-300×217.jpg” style_type=”dropshadow” hover_type=”zoomin” bordercolor=”” bordersize=”0px” borderradius=”0″ stylecolor=”” align=”center” link=”” linktarget=”_self” animation_type=”0″ animation_direction=”down” animation_speed=”0.1″ hide_on_mobile=”no” class=”” id=””] 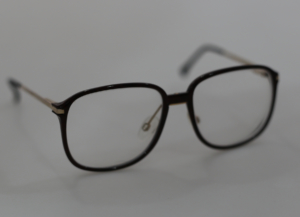 [/fusion_imageframe][/fusion_builder_column][fusion_builder_column type=”1_3″ last=”no” spacing=”yes” center_content=”yes” hide_on_mobile=”yes” background_color=”” background_image=”” background_repeat=”no-repeat” background_position=”center center” border_position=”all” border_size=”0px” border_color=”” border_style=”solid” padding=”” margin_top=”” margin_bottom=”” animation_type=”0″ animation_direction=”down” animation_speed=”0.1″ class=”” id=””][fusion_imageframe lightbox=”yes” lightbox_image=”https://blog.lumitecfoto.com.br/wp-content/uploads/2016/04/IMG_7566-300×217.jpg” style_type=”dropshadow” hover_type=”zoomin” bordercolor=”” bordersize=”0px” borderradius=”0″ stylecolor=”” align=”center” link=”” linktarget=”_self” animation_type=”0″ animation_direction=”down” animation_speed=”0.1″ hide_on_mobile=”no” class=”” id=””]
  [/fusion_imageframe][/fusion_builder_column][fusion_builder_column type=”1_3″ last=”yes” spacing=”yes” center_content=”yes” hide_on_mobile=”yes” background_color=”” background_image=”” background_repeat=”no-repeat” background_position=”center center” border_position=”all” border_size=”0px” border_color=”” border_style=”solid” padding=”” margin_top=”” margin_bottom=”” animation_type=”0″ animation_direction=”down” animation_speed=”0.1″ class=”” id=””][fusion_imageframe lightbox=”yes” lightbox_image=”https://blog.lumitecfoto.com.br/wp-content/uploads/2016/04/IMG_7565-300×217.jpg” style_type=”dropshadow” hover_type=”zoomin” bordercolor=”” bordersize=”0px” borderradius=”0″ stylecolor=”” align=”center” link=”” linktarget=”_self” animation_type=”0″ animation_direction=”down” animation_speed=”0.1″ hide_on_mobile=”no” class=”” id=””]
 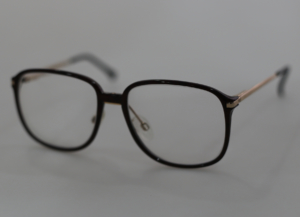 [/fusion_imageframe][/fusion_builder_column][fusion_builder_column type=”1_1″ last=”yes” spacing=”yes” center_content=”no” hide_on_mobile=”no” background_color=”” background_image=”” background_repeat=”no-repeat” background_position=”left top” border_position=”all” border_size=”0px” border_color=”” border_style=”” padding=”” margin_top=”” margin_bottom=”” animation_type=”” animation_direction=”” animation_speed=”0.1″ class=”” id=””][fusion_text]Após você posicionar suas roupas conforme seu gosto, esta na hora de montarmos o set de iluminação. Primeiramente vamos posicionar uma iluminação a direita e a outra a esquerda e inclinarmos 90º graus:[/fusion_text][/fusion_builder_column][fusion_builder_column type=”1_1″ last=”yes” spacing=”yes” center_content=”no” hide_on_mobile=”no” background_color=”” background_image=”” background_repeat=”no-repeat” background_position=”left top” border_position=”all” border_size=”0px” border_color=”” border_style=”” padding=”” margin_top=”” margin_bottom=”” animation_type=”” animation_direction=”” animation_speed=”0.1″ class=”” id=””][fusion_imageframe lightbox=”yes” lightbox_image=”https://blog.lumitecfoto.com.br/wp-content/uploads/2016/04/DSC_0009-300×217.jpg” style_type=”none” hover_type=”zoomin” bordercolor=”” bordersize=”0px” borderradius=”0″ stylecolor=”” align=”center” link=”” linktarget=”_self” animation_type=”0″ animation_direction=”down” animation_speed=”0.1″ hide_on_mobile=”no” class=”” id=””]
 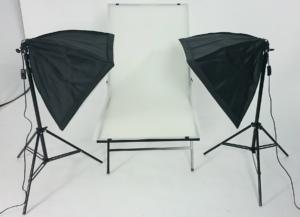 [/fusion_imageframe][/fusion_builder_column][fusion_builder_column type=”1_1″ last=”yes” spacing=”yes” center_content=”no” hide_on_mobile=”no” background_color=”” background_image=”” background_repeat=”no-repeat” background_position=”left top” border_position=”all” border_size=”0px” border_color=”” border_style=”” padding=”” margin_top=”” margin_bottom=”” animation_type=”” animation_direction=”” animation_speed=”0.1″ class=”” id=””][fusion_text]Na câmera vamos colocar Iso 400, Velocidade 1/5 e Abertura 22.
Importante saber: Iso 400, pois não vai granular nossa foto, assim podemos ampliar o “quanto” quisermos e não teremos nenhum ruido na imagem. Se subirmos o ISO para 600, 800 e assim que seja, quanto mais subirmos, mais clareamos a foto, porem granulamos mais a imagem.
A velocidade neste caso vamos usar 1/5, e vamos colocar a câmera em algum tripé ou algum suporte para que ela não saia foto tremida, pois estamos com a velocidade um pouco baixa.
Ja a nossa abertura, nesse caso, precissamos trazer todos os detalhes dos óculos, então quanto maior for o numero da abertura, mais vai nos trazer os detalhes. porem quanto mais subir esses números, mais vai escurecer nossa fotografia.
Fizemos diversos testes, e para essas iluminações o melhor definido para trazer todos detalhes e não ficar nem claro e nem escuro, nossa abertura ideal é a f:22.
E nosso resultado:[/fusion_text][/fusion_builder_column][fusion_builder_column type=”1_2″ last=”no” spacing=”yes” center_content=”no” hide_on_mobile=”no” background_color=”” background_image=”” background_repeat=”no-repeat” background_position=”left top” border_position=”all” border_size=”0px” border_color=”” border_style=”” padding=”” margin_top=”” margin_bottom=”” animation_type=”” animation_direction=”” animation_speed=”0.1″ class=”” id=””][fusion_imageframe lightbox=”yes” lightbox_image=”https://blog.lumitecfoto.com.br/wp-content/uploads/2016/04/IMG_7565-300×217.jpg” style_type=”none” hover_type=”zoomin” bordercolor=”” bordersize=”0px” borderradius=”0″ stylecolor=”” align=”none” link=”” linktarget=”_self” animation_type=”0″ animation_direction=”down” animation_speed=”0.1″ hide_on_mobile=”no” class=”” id=””] [/fusion_imageframe][/fusion_builder_column][fusion_builder_column type=”1_2″ last=”yes” spacing=”yes” center_content=”no” hide_on_mobile=”no” background_color=”” background_image=”” background_repeat=”no-repeat” background_position=”left top” border_position=”all” border_size=”0px” border_color=”” border_style=”” padding=”” margin_top=”” margin_bottom=”” animation_type=”” animation_direction=”” animation_speed=”0.1″ class=”” id=””][fusion_imageframe lightbox=”yes” lightbox_image=”https://blog.lumitecfoto.com.br/wp-content/uploads/2016/04/IMG_7580-300×217.jpg” style_type=”none” hover_type=”zoomin” bordercolor=”” bordersize=”0px” borderradius=”0″ stylecolor=”” align=”none” link=”” linktarget=”_self” animation_type=”0″ animation_direction=”down” animation_speed=”0.1″ hide_on_mobile=”no” class=”” id=””] [/fusion_imageframe][/fusion_builder_column][fusion_builder_column type=”1_1″ last=”yes” spacing=”yes” center_content=”no” hide_on_mobile=”no” background_color=”” background_image=”” background_repeat=”no-repeat” background_position=”left top” border_position=”all” border_size=”0px” border_color=”” border_style=”” padding=”” margin_top=”” margin_bottom=”” animation_type=”” animation_direction=”” animation_speed=”0.1″ class=”” id=””][fusion_text]
Percebemos que ainda nao estamos 100% branco.
PASSO 2
Na Iluminação:
Vamos acrescentar a terceira iluminação junto a girafa em nosso set:[/fusion_text][/fusion_builder_column][fusion_builder_column type=”1_1″ last=”yes” spacing=”yes” center_content=”no” hide_on_mobile=”no” background_color=”” background_image=”” background_repeat=”no-repeat” background_position=”left top” border_position=”all” border_size=”0px” border_color=”” border_style=”” padding=”” margin_top=”” margin_bottom=”” animation_type=”” animation_direction=”” animation_speed=”0.1″ class=”” id=””][fusion_imageframe lightbox=”yes” lightbox_image=”https://blog.lumitecfoto.com.br/wp-content/uploads/2016/04/DSC_0008-300×217.jpg” style_type=”bottomshadow” hover_type=”zoomin” bordercolor=”#000000″ bordersize=”” borderradius=”” stylecolor=”#000000″ align=”center” link=”” linktarget=”_self” animation_type=”zoom” animation_direction=”down” animation_speed=”0.1″ hide_on_mobile=”no” class=”” id=””] 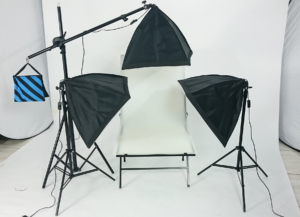 [/fusion_imageframe][/fusion_builder_column][fusion_builder_column type=”1_1″ last=”yes” spacing=”yes” center_content=”no” hide_on_mobile=”no” background_color=”” background_image=”” background_repeat=”no-repeat” background_position=”left top” border_position=”all” border_size=”0px” border_color=”” border_style=”” padding=”” margin_top=”” margin_bottom=”” animation_type=”” animation_direction=”” animation_speed=”0.1″ class=”” id=””][fusion_text]
Após configurarmos as posições corretas das iluminações e ajustarmos a câmera corretamente, ainda no iso 400, velocidade 1/15 e abertura 22.
 Temos o resultado de nosso foto final:
[/fusion_text][/fusion_builder_column][fusion_builder_column type=”1_2″ last=”no” spacing=”yes” center_content=”yes” hide_on_mobile=”yes” background_color=”” background_image=”” background_repeat=”no-repeat” background_position=”center center” border_position=”all” border_size=”0px” border_color=”” border_style=”solid” padding=”” margin_top=”” margin_bottom=”” animation_type=”0″ animation_direction=”down” animation_speed=”0.1″ class=”” id=””][fusion_imageframe lightbox=”yes” lightbox_image=”https://blog.lumitecfoto.com.br/wp-content/uploads/2016/04/MG_7559-300×217.jpg” style_type=”dropshadow” hover_type=”zoomin” bordercolor=”” bordersize=”0px” borderradius=”0″ stylecolor=”” align=”center” link=”” linktarget=”_self” animation_type=”0″ animation_direction=”down” animation_speed=”0.1″ hide_on_mobile=”no” class=”” id=””] [/fusion_imageframe][/fusion_builder_column][fusion_builder_column type=”1_2″ last=”yes” spacing=”yes” center_content=”yes” hide_on_mobile=”yes” background_color=”” background_image=”” background_repeat=”no-repeat” background_position=”center center” border_position=”all” border_size=”0px” border_color=”” border_style=”solid” padding=”” margin_top=”” margin_bottom=”” animation_type=”0″ animation_direction=”down” animation_speed=”0.1″ class=”” id=””][fusion_imageframe lightbox=”yes” lightbox_image=”https://blog.lumitecfoto.com.br/wp-content/uploads/2016/04/MG_7577-300×217.jpg” style_type=”dropshadow” hover_type=”zoomin” bordercolor=”” bordersize=”0px” borderradius=”0″ stylecolor=”” align=”center” link=”” linktarget=”_self” animation_type=”0″ animation_direction=”down” animation_speed=”0.1″ hide_on_mobile=”no” class=”” id=””] [/fusion_imageframe][/fusion_builder_column][fusion_builder_column type=”1_1″ last=”yes” spacing=”yes” center_content=”no” hide_on_mobile=”no” background_color=”” background_image=”” background_repeat=”no-repeat” background_position=”left top” border_position=”all” border_size=”0px” border_color=”” border_style=”” padding=”” margin_top=”” margin_bottom=”” animation_type=”” animation_direction=”” animation_speed=”0.1″ class=”” id=””][fusion_text]é imprescindível você bater o branco para trazer a cor correta de seu produto.
Se você fizer a foto e o produto não vir com a cor verdadeira, é preciso seguir os passos listados no tutorial do link abaixo.
é bem fácil e rápido e pratico esse método, não deixa de ver
https://blog.lumitecfoto.com.br/introducao-ao-balanco-de-branco/[/fusion_text][/fusion_builder_column][fusion_builder_column type=”1_1″ background_position=”left top” background_color=”” border_size=”” border_color=”” border_style=”solid” spacing=”yes” background_image=”” background_repeat=”no-repeat” padding=”” margin_top=”0px” margin_bottom=”0px” class=”” id=”” animation_type=”” animation_speed=”0.3″ animation_direction=”left” hide_on_mobile=”no” center_content=”no” min_height=”none”][fusion_text]Abaixo temos um breve tutorial em vídeo: https://youtu.be/5bvz-2Bht8Y[/fusion_text][/fusion_builder_column][fusion_builder_column type=”1_1″ background_position=”left top” background_color=”” border_size=”” border_color=”” border_style=”solid” spacing=”yes” background_image=”” background_repeat=”no-repeat” padding=”” margin_top=”0px” margin_bottom=”0px” class=”” id=”” animation_type=”” animation_speed=”0.3″ animation_direction=”left” hide_on_mobile=”no” center_content=”no” min_height=”none”][fusion_youtube id=”5bvz-2Bht8Y” width=”600″ height=”350″ autoplay=”no” api_params=”” class=””/][/fusion_builder_column][fusion_builder_column type=”1_1″ last=”yes” spacing=”yes” center_content=”no” hide_on_mobile=”no” background_color=”” background_image=”” background_repeat=”no-repeat” background_position=”left top” border_position=”all” border_size=”0px” border_color=”” border_style=”” padding=”” margin_top=”” margin_bottom=”” animation_type=”” animation_direction=”” animation_speed=”0.1″ class=”” id=””][fusion_text]
Você tambem pode fazer a compra de nossos produtos:
Conjunto completo
 https://www.lumitecfoto.com.br/produto/308/Iluminacao-para-fotografia---Conjunto-com-3-flashes-200-com-softbox-e-girafa
Mesa de still pequena
https://www.lumitecfoto.com.br/produto/220/Mesa-pequena-portatil
Girafa grande:
https://www.lumitecfoto.com.br/produto/110/Girafa-grande-com-bolsa-de-enchimento-para-contra-peso
Tripé de câmera:
https://www.lumitecfoto.com.br/produto/1151/Tripe-Velbon-VideoMate-538
[/fusion_text][/fusion_builder_column][/fusion_builder_row][/fusion_builder_container]


